Navigation

Showing posts with label DIY. Show all posts

Friday, February 14, 2014

Interview and DIY over at How.Do


In the interest of creating something special and handmade for your loved one this Valentines Day, How.Do approached me to contribute one of my DIY projects for their app. You can check out their interview with me over on the How.Do blog, where you can also find a link to my DIY project for creating a paper book cover (Japanese style). It's slightly different from the version that you can see here on the blog, because the images are accompanied by a voice telling you what to do. I was really nervous to record my voice. Like everyone I've met, ever, I hate hearing my voice recorded. But I think it came out okay!

Let me know if you have a listen, and if you think hearing a DIY like this is more helpful than just reading words with pictures. I really enjoyed the process and I think it's a great way to share a DIY project - you can sign up for the How.Do app and find many more DIYs, recipes and other tutorials as well (it's free!)

Kitty
xo

*This is not an affiliate post, I just think this app is great fun!

Sunday, December 8, 2013

Weekend Project - Washi Tape Cables

So I went and did something productive this weekend. Go figure! OK, so maybe making my electrical cables look pretty isn't that productive, but I do have a sense of accomplishment. I saw this project on Design Love Fest ages ago and I knew I'd get around to it one day. Since the Christmas tree will be decorated tonight (!) and I needed to re-arrange all of our cables to fit the lights in, it was the perfect time.

Materials:
Some MT washi tape from Japan (you can get it here and here)
Washi Tape from ModCloth
Extension cables or any electrical cable that is causing an eyesore (preferably round and white as washi tape is semi-transparent and won't be seen well on a black cable)
All I did was devise a pattern that I would follow with 3 colours and cut short pieces of tape (around 1" long, enough to wrap around the cable once) and wrapped them neatly around the cable in alternating colours! So easy, I probably didn't even need to say it ;) I found the effect worked best with one bold/solid colour and a couple of more simple patterns to complement.

One note, a couple of the tapes didn't stick so well onto themselves. They stick fine on paper, but maybe their own surface is too shiny. Both tapes that did this were MT tape, but other rolls of MT stuck just fine. *shrug* maybe they were just old or something. I always like to do honest DIY projects, so if you have a go, you can learn from my hiccups. If you have a chance, maybe wrap one row of each colour around a cord and check it the following day to see if any particular rolls have the no-stick problem. (the orange one on the image below is a bit peel-y)
Other than that, I'm so happy with my cables, they look a bazillion times better and I'm happy to have them spread across the floor like skinny beautiful coral snakes :)

What did you get up to this weekend? In addition to cable beautification, I devoured the latest issue of Frankie Magazine on a picnic blanket outside with the cats, Mazzy Star and some stink bugs buzzing lazily through the air, it was quite marvellous. (the stink bugs kept their distance, thank goodness)

Kitty
xo

Follow Facebook Bloglovin' Pinterest

Don't forget to enter the Amy Grace giveaway - you can win a Jakko cosmetics bag from Ted Baker!

Wednesday, August 14, 2013

DIY Japanese Paper Book Cover

When we were in Japan, we managed to find books to buy, even though we don't speak Japanese well enough to read. Of course, there were art books, manga and English-language books too. The first time a book store cashier asked me to choose some paper for my books, I thought he was gift wrapping them for me. But no, he very deftly folded the paper into a perfect protective cover for each book. As we made our way through the country, we realised that this was quite common, and often stores just used brown paper with their logo on it. Today I thought I'd show you the book covering technique, it's a great way to protect your paperbacks and decorate notebooks as well. I found some beautiful double-sided paper at a local bookstore :)
1. Cut a piece of paper so that it's edges extend approximately 2" around every side of the (open) book that you'd like to cover. (This example could have had a little more paper for the top and bottom)
2. Mark the top and bottom of the book by creating a little crease in line with the edges.
3. Take the book off the paper and fold in a straight line, along the crease guides.
4. Check your folds against the book. They should be flush with the top and bottom of your book. If they extend beyond the edges of the book, they will become damaged and rough really quickly.
5. Place the book so that the spine is in the centre of your paper. If you're covering a thicker book, like a paperback, you can mark the width of the spine with the same technique from step 2 and create some crisp folds to go around the spine.
6. Fold in the front and back cover edges firmly around the cover, making a sharp fold.
7. Here's the special part! Tuck the cover into the slit between the folds. You'll need to gently bend it to slot it in. This will hold the cover firmly on your book without the need for adhesives.
8. Admire your handiwork! It's such a nice way to protect your books and pretty them up at the same time. It's a bit of a shame to cover up the illustration and title of "I Am The Cheese" by Robert Cormier, and I have to admit, the cover won't be staying on that one! I just needed a book of the right size for my second piece of paper, and there he was. For me, this is more of a notebook covering thing. Oh, and it was quite handy to cover up my Japanese phrasebook while we were in Japan so I didn't look like a total tourist ;)
I hope you enjoyed this little DIY, feel free to share your handiwork with me in the comments or on social media! @KittyAndBuck will find me on Instagram, Twitter, Pinterest and Google+.
(sorry about the grainy pictures, it's winter here and light isn't the greatest)

Kitty
xo

Speaking of books, how would you like to win this one?! Giveaway ends tomorrow, so be quick.

(keep up to date with Kitty & Buck with Bloglovin')

Monday, July 1, 2013

Japanese Candy DIY Style

When we were in Japan, as I'm sure many of you have experienced when in unfamiliar places, the food was quite mysterious. I can read some Japanese, but unless is was spelling an anglicised word, I was at a loss for translating anything. We tried all manner of strange (to us!) candies and treats, and found a few favourites that we now crave. I'll need to hunt them down at a Japanese supermarket.

While we were in Kyoto, we met a fellow traveler from Liverpool, in the UK. His name was Gerard and we went on many an adventure together. His parting gift to us was a care package of Japanese candies, which were a little more involved than just unwrapping and eating. Check them out.
Panda Keiki - I'm assuming this one is called a Panda Cake.
I cannot read the instructions, but it seems fairly straightforward. Packet #1 goes into the small 'bowl'. Packet #2 goes into the larger 'bowl'. Chocolate mix goes into the makeshift piping bag. Fill in panda face details. Microwave for... erm... some time. 50... seconds? Sounds right.
For the record, Panda Keiki tastes like a fluffy pancake!
Mr Moustache. Not too much involved here, actually. Unwrap moustache. Pull a funny face. Eat. They're cola flavoured gummy moustaches :)
Hanbaagaa-Keiki, oh, Hanbaagaa-Keiki. You have made my dreams come true of becoming some kind of Willy Wonka mastermind.
When I opened this little package, I was expecting.. well, cake.
When I mixed the first little powdered package with water, I wondered if it was just me, or if the cake smelled... savoury. I continued onto the 'beef' patty and oh lordy, that cake mix smelled like ground beef!
The cheese powder smelled like cheese, the tomato sauce powder smelled like... you guessed it, tomato sauce (sorry, ketchup for my American viewers).
The burgers are so tiny you almost need tweezers to manipulate the little slices of beef and cheese and bun. This one was by far the most complex to make. I think it took me almost 2 hours!! I guess I was stopping to take photos (and occasionally gag from the super-realistic meat smell)
Nobody was particularly game to taste test the Hanbaagaa-keiki. We finally delivered the mini-cake-burgers to a willing participant who exclaimed, just like a child in Willy Wonka's factory, "The cheeseburgers taste like cheeseburgers!!!!" The hours of work were worth it for the excited taste-testing episode. The french fries were not 100% realistic-tasting, but apparently quite buttery and potato-flavoured. And the soda, although it said "kora" (Cola) on the package, was apparently more of a cherry flavour. Cherry Cola!!
What on earth do you guys make of this Japanese DIY cake-fest? I understand now how much fun it is to build look-a-like food. It's also a good deterrent to eating quickly and too much. I like the Japanese concept of "kata" which translates to 'form' and is generally used as a term for mastering a process. It encompasses the Japanese culture for me, when they do something, they tend to do it well, if not 'perfectly'. That's how I feel about the cake. They don't want it to just look like a Hamburger, it needs to embody the spirit of a hamburger. A hamburger the size of a thimble.

Kitty
xo
(keep up to date with Kitty & Buck with Bloglovin')

Monday, April 8, 2013

DIY - How I Dye My Hair: Pastels and Brights

People are always interested in how I dye my hair, and I've had a few requests to create a DIY on Kitty & Buck. I'm not a hairdresser (by any means) so I can only share my experience, perhaps it can help you out! If you have any specific questions about your hair, I definitely recommend visiting a professional, I make sure I see my hairdresser at least once every 3 months to keep on top of my hair health with a trim and touch-up on my roots. In the past year, I've only had my bleaching done once. My hairdresser prefers to keep my highlights underneath my 'natural' colour so that they can grow out and not need retouching every time. This helps to keep bleaching to a minimum. The same goes for my fringe, it basically grows all the way out before we retouch it with the bleach.
I purchased my hair colours from Hair Crazy. I don't know if this is the best place or not, I just stumbled across it, and because I bought so many colours, I haven't needed to replenish them yet. I also grab the odd colour from a pharmacy, which is the "Fudge" brand that we have in Australia.

What you need:
Hair Dye
Conditioner
Latex Gloves
Tinfoil (pre-torn into pieces, big enough to wrap your hair - it will depend how long your hair is)
Plastic Wrap
Plate or palette
Tint Brush

Preparation:
I always cover my plate in plastic wrap so I can just wrap it all up and throw away the excess dye at the end. The plate is clean too! So I don't need to worry about cleaning the dye off it. When I dye my hair, I try to wear an old top in case I spill dye on it. One that you can take off without going over your head is best - a zip or button up top. Finally, I place some plastic wrap on the bathroom countertop, so if I do spill dye, it is protected. The only issue is, I always spill dye everywhere where there isn't plastic wrap. It's called Murphy's Law.
This is how I do it:
I mix my colours on the plate, I never really use a colour 'out of the bottle', I love making my own. So get creative and mix your colours! Some knowledge of what might happen to the colour when you mix is useful... I wouldn't mix green and red, for example ;) You can see a post about what colours I mixed together here. If I want the colour to be more pastel, I mix in some conditioner with it. I actually mix a little conditioner into all of my colours, so my hair gets some extra conditioning love. Keep in mind, the more conditioner you add, the lighter the colour and the less time it will last. This time, I am going more vibrant and I know these colours wash out to a nice pastel over time.
I pin all of my non-bleached hair into a pile on top of my head, with a conditioning treatment applied. It's good for my hair and helps 'glue' it up there while the colour is being applied.
Colour-time! I work with one colour at a time, to avoid cross-pollinating the brush. First up, pink and blue! I find the pink and blue washes out first, so I apply them first so they have the longest time on my hair, and hopefully 'takes' more.
I select a section of hair where I want the colour and 'paint' it on using the brush. You have to work in fairly small sections to ensure that each strand of hair gets coated. As each section is painted, I wrap it in foil. This protects it from bumping on my clothes, other pieces of hair, and keeps it from drying out while I let the dye soak in.
I work my way through each colour, trying to make a nice rainbow dispersion over my head. (It's pretty random!) Make sure you wash the brush in between each colour, and dry it on an old towel so it doesn't water down your dye. Continue painting and wrapping until you look like a crazy lady.
Most packets say to leave the dye in for 15 minutes or so. I usually leave mine for 1-2 hours. It gets very vibrant, but I find it lasts longer too. For more pastel colours, aside from adding conditioner, you can leave the colour in for less time too. When I had baby pink in my fringe, I put in a strong red dye for about 1-2 minutes. So there are a few ways you can work.

I wash it out in the shower, gently pulling the foil out under running water. Then I wash it a couple of times with shampoo to get rid of all the excess dye. Finish with a good conditioner, and then... Admire your handiwork.

Easy? I have a few extra points.
1. ALWAYS test for allergies to a dye before you use it. There is generally a warning on the packet and instructions on how to do a test
2. Bright or pastel colours won't work unless your hair is very light to begin with
3. I don't recommend lightening your own hair unless you know what you're doing. I get my hairdresser to do mine, and you should too if you're unsure of the process, or how your hair will react.
4. Be creative! Mix your own colours, try different combinations and be yourself.
5. Remember, it washes out! But sometimes it can take months, depending on the colour and how 'grabby' your hair is. If you're looking for something less permanent  try hair chalk as it washes out on the first wash.
I hope that answers some questions you've had about bright and pastel colours hair dye. You can let me know in the comments below if you have any more questions, or if anything is unclear. Right now, I'm on a mountain in southern Japan, staying with some monks, so I may be slow in responding to your comments, but I promise I will as soon as I come down from the mountain ;)
Kitty
xo

Tuesday, March 26, 2013

Sort of a DIY - Packing Light

So many people are alarmed, shocked and look ready to call the men in white coats when I say I like to travel with only a carry-on bag, even for holidays that last for 6 weeks. It's really important to me to be comfortable and not stressed out when I'm traveling and for me, lugging around a humongous suitcase full of my entire wardrobe is not cool. I'll make a disclaimer. I've paid for a checked bag on the way back in case I go shopping. So I may bring a suitcase back. But I don't expect it to be full, even after thrift shopping in Koenji and visiting the folk artists in Takayama :) This is whats in my suitcase:
We have two black tunics that can be worn under a skirt/dress for warmth and also layered with each other, a knitted black top that can go with jeans, a skirt and over my dress. A stripy top to go with jeans and a skirt and a pyjama top for sleeping in. (that's usually how I use pyjama tops, but I thought I'd be clear!) Very important is my eye mask for sleeping peacefully on the plane (ha!) and in hotels/inns and guest houses, where you never know how bright it might be from sunrise, street lights, hotel lighting etc. I'm also wearing some clothes too, you'll see the outfit in tomorrow's post :) Also, you might notice I'm not bringing a skirt, but I'm talking about one. I'll buy one in Japan, I hope!

The right pile is: One pair of jeans, my Uptights cat leggings (they can double as sleeping pants if it gets cold, or gym pants if I'm feeling crazy) 3 x pairs of tights, they all work with everything in my suitcase colour-wise. Four pairs of brand new socks, because my shoes will be coming on and off a LOT. I figure, each night I can wash socks in the basin if I can't find a laundromat, and in Tokyo, I'll definitely be buying a couple more pairs of super cute socks (I can feel it in my bones)

All of my outfits are interchangeable, and with what I have here, I have a different outfit for at least 6-8 days running.

My cosmetics are pared right down for traveling too. The main thing is contact lens solution (bor-ring). I have a small cleanser, moisturiser, tinted sunscreen, deodorant. Some foundation and primer for going out, mascara. Three lip shades (pink, orange and red) and eyeliner. Oh and lip balm and toothpaste. If I need anything else, I'll buy it over there.

Things that are not pictured - my spare pair of shoes, hair straightener and about 8 pairs of underwear. That should tide me over until we find a laundromat. Oh and one spare bra. In my handbag I have my wallet, travel documents, two cameras, camera charger and spare SD cards, and 2 books. And that's it!

I'd love to tell you more, but I think it explains itself, and my plane leaves in, oh, 4 hours. Time for a nap! I hope this helps you out if you're trying to pack light. Remember to mix and match outfits, pare down your cosmetics to the bare minimum and pack light! It makes life so much easier!

Kitty
xo

Sunday, September 16, 2012

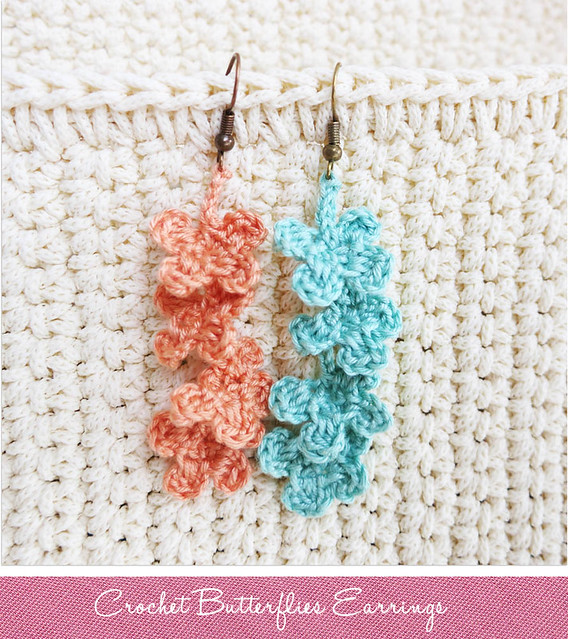
Guest Post from Praew Channel - Crochet Butterflies Earrings

Hello Kitty & Buck readers! I am Praew from Praew Channel. I am so excited that I have a great opportunity to do a guest post here. I love to crochet very much so I would like to do a simple and fun crochet project for you to try!

I have lots of cute pastel colors of mercerized cotton yarn that I bought from the yarn shop in my neighborhood a month ago. Since I am honored to do a guest post for Kitty & Buck, I think it is a great opportunity to use my cute new yarn. So I started playing around with stitches and this is what I came up with.


Surprisingly, I used more than 1 hour just to decide which color I will start with. Finally, I picked this orange and teal green to make a pair of earrings. Yes...my earrings will be one orange and one teal green. I just love both colors.

If you would like to try to crochet these cute earrings, you are welcome to try. I’ve attempted to write out the pattern as shown below. Have fun!

What you will need:
  •     crochet hook 1.3mm ( 1mm is ok as well)
  •     mercerized cotton yarn size 20
  •     2 earring hooks
DIY Love: Crochet Butterflies Earrings
Let's begin...

Step 1:  Chain 6 and join the first and the last chain with slip stitch to make a circle.
Step 2:  1 butterfly consists of 4 parts. Make the first part by follow these steps below
  • Step 2.1: Make 1 single crochet.
  • Step 2.2: Chain 3.
  • Step 2.3 Making 2 unfinished double crochet in the same single crochet stitch made in (2.1).
  • Step 2.4: Now you have 3 loops on the hook. Yarn over and pull through 3 loops.
DIY Love: Crochet Butterflies Earrings
  • Step 2.5: Chain 3 then join with the single crochet stitch made in (2.1) by making a slip stitch. Now you have the first part of the butterfly.
DIY Love: Crochet Butterflies Earrings

Step 3: Repeat step 2 (2.1 - 2.5) 3 times to make the other 3 parts of the butterfly.  Now you have the first butterfly.
 Step 4: Make a single crochet then chain 4

DIY Love: Crochet Butterflies Earrings

Step 5: Repeat step 1-3 to make the second butterfly.
Step 6: Make a single crochet then chain 4
Step 7: Repeat step 1-3 to make the third butterfly.
Step 8: Make a single crochet then chain 4
Step 9: Repeat step 1-3 to make the fourth butterfly.
Step 10: Make a single crochet then chain 4.

DIY Love: Crochet Butterflies Earrings

Step 11: Put the hook through the ring of the earring hook and yarn over. Then pull through the ring of the earring hook again followed by pulling through the loop on the hook.
Step 12: Make a slip stitch in each chain for all 4 chains towards the fourth butterfly. Bind off.

DIY Love: Crochet Butterflies Earrings

I hope you enjoy the tutorial!  xo, Praew

Wow, thank you so much for preparing that awesome tutorial Praew, those earrings look beautiful! I'd love to see if any of you guys make these, so feel free to leave a link in the comments below. I'm feeling the urge to learn crochet now!

Please go and say hello to Praew over at her blog too, she has a lot of lovely pictures around Thailand as well as heaps of great recipes and lots of other interesting bits and pieces to look at too!

Kitty
xo

Etsy